Creating a new user
This tutorial guides you through all the steps needed to create a new Ariadne user.
Create a user object somewhere in the /system/users/ directory. You can also add subdirectories to group users together. For this example we'll create a user with the login 'test'.
/system/users/ directory will not be able to logon by default. You can create extra users directories by adding a configuration setting in a config.ini template. This directory will then be available for user accounts for all sites below that config.ini setting. e.g.:<pinp>To enable users other than Admin to add user accounts, you must also add a typetree.ini template on the users and groups directory. For users:
$arConfig = getvar('arConfig');
$arConfig['authentication'] = array(
"userdirs" => array(
$path . "system/users/"
),
"groupdirs" => array(
$path . "system/groups/"
)
);
putvar('arConfig', $arConfig);
</pinp>
<pinp>And for groups:
$arTypeTree = getvar('arTypeTree');
$arTypeTree['pdir']['puser'] = gettext('user');
putvar('arTypeTree', $arTypeTree);
</pinp>
<pinp>
  $arTypeTree = getvar('arTypeTree');
  $arTypeTree['pdir']['pgroup'] = gettext('group');
  putvar('arTypeTree', $arTypeTree);
</pinp>

Browse to the /system/users/ directory in Ariadne and press 'Add new object'.

Then select the type 'User' from the list of available object types.

Enter the login name 'test', then click on 'Data'.
Data

Enter the user name and password. You need to enter the password twice to make sure there are no typo's in the password. For the profile you can either select the default profile or no profile.
Profiles help when creating many similar user accounts. You can create a profile with most of the necessary options filled with default values, then simply select the correct profile when creating a new user account.
Set the 'Change owner on all children' to 'Yes' if you want to user the special 'Owner' group to set grants later on. If set to 'Yes', the owner of the new user object and all objects below it, will be set to the new user account.
Preferences

The next step is to set the preferences for the new user account. The default interface is not set to the Windows XP look, you may want to change that. You can also change it in the 'default' profile (in /system/profiles/default/) so you won't have to remember it later.
Groups

Finally set the groups of which the user is a member, and press 'Save'.
Selecting 'users' allows the user to use the Ariadne management interface. You can create your own groups under /system/groups/ and they will automatically show up in the list.
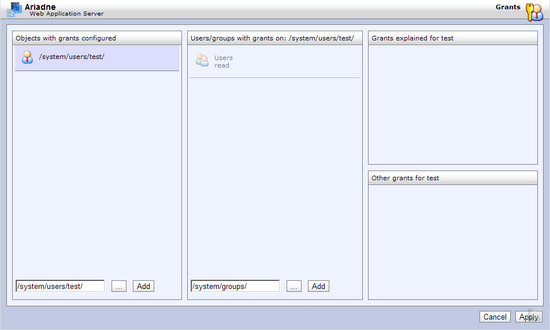
 After saving the new user account, you need to do a few more things. First you might want to add some grants on the users 'home directory' (which is actually the same user object you have just created). Browse to the new user object and click on 'Settings: Grants'.

You will see a dialog like the one above. Click on the 'Add' button in the middle panel and browse to 'Users' and select the user 'User, Test'.
/system/users/ as the starting path and select the user via that path.
Then check the checkboxes 'Read', 'Add' and 'Edit'. Click on the little arrow to the right of 'Delete', visible when you hover over it with the mouse cursor. There click on the '>' button. Then press apply.

The next screen shows an overview of all the changes you made in the grants dialog. Press Apply again to save the changes.
The new user will now be able to add, edit and delete objects in his or her own directory. He won't be able to delete his own account however, because of the '>' in front of 'delete'.
The last thing to do is to add a shortcut from the user's home directory to the content the user may access. Browse to the new user object you just created, again click on 'Add new object' and select the type 'Shortcut'.

Then enter a filename for the shortcut, say 'ariadne', and click on 'Data'. Finally enter the title or name of the object, and select the path it should point to.

In this case the shortcut points to the root of the Ariadne store, allowing access to the full tree. Note however that setting the shortcut is not enough, you will also have to make sure that either the user object is directly granted read (and perhaps edit, add, delete, etc.) access to that content, or via a group of which the user is a member.
For a full discussion of the possible grants Ariadne understands, see the tutorial on grants.